ZUEEUZ.blogspot.com


Friday, May 20, 2011

Thrift Share and Vintage Inspiration


I was just thinkin', it's Debra's Vintage Inspiration Friday over at Common Ground and I've got nothin'!

Oh, but I do!

I had taken pictures of my estate sale treasures from last weekend intending to get them in the Thrift Share Monday over at Apron Thrift Girl.  Ya, that didn't happen.  But wait!  Her party's still open so I'll link with her as well!

So, I do have something to share for today!


First off, this pair of vintage suitcases.


They match on the outside but the smaller one is kinda pinkish purple, love the double pockets on the top!


And the other is more gray.


I don't know, his and hers, or just a different dye lot for the fabric to fade differently?


The scuffs are cleaned up and they are displayed in my baby boys room for now.  Actually I should run around and take some pictures, the house is clean cause we're expecting company this afternoon.


I got a few odds and ends, here's a couple more interesting.  I think the holder thingy will come in handy if when I try soldering again.  And I love the color of this vintage travel journal.


This is the coolest thing I got.  I saw it in the sale listing but I wasn't able to go until half price Sunday.  Surprisingly it was still there, so I snapped it up first thing!


It's got a nice file size drawer and a little built in tray in the top drawer.


But the coolest feature is that the back is finished nicely so that you could face it into a room.


I tried and tried to work this into my living room when we got our new sofa and chairs delivered this week but I couldn't make it work.  It's alot bigger than it appears, 50" wide by 25" deep.

I thought about selling it on craigslist but I really do love it.  I'm just a sucker for french provincial!  It's in our bedroom for now.

Have a great weekend!


Thursday, May 19, 2011

Call Me a Paint Groupie

Or just call me a big nerd but I just got this email and I have to share it with you all because I just love Behr Paint!  They're having a rebate, $5 off a gallon.  
Hey, five bucks is five buck!

I will have them color match anyone else's color.  I haven't tried their new paint with primer yet, their regular paint has always worked just great!  Okay, fine I did use a primer with red, but red is difficult, it doesn't count!

Now all I have to do is figure out what I need to paint!
Below is just copied from my email so


click here for the link!

Also, I edited my last post to add something I forgot.....check the end of the post.

The Home Depot® Memorial Day Promotion

>From May 19 – May 30, you can save $5 on one gallon sizes and $20 on 5 gallon sizes of BEHR® PREMIUM PLUS or BEHR® PREMIUM PLUS ULTRA Interior and Exterior Paints and Primers, Decorative Finishes, Waterproofers, Stains and Cleaners by manufacturer mail-in rebate.  


Offer valid in the United States at participating The Home Depot® stores only (including Guam, Puerto Rico and USVI).


For the details of this offer and for the rebate forms, please Click Here.


When you finish your project, share your story, photos, and video to enter our Behr Your Colors™ sweepstakes.  You may be eligible to win a $500 gift card!


Visit www.behr.com/behryourcolors/ or www.behr.com/facebookbehryourcolors to share your color story.  For sweepstakes rules, visit www.behr.com/storiessweepstakesrules/ Add us on Facebook Follow us on Twitter


Tuesday, May 17, 2011

White Wednesday One Hundred


I'm celebrating the 100th White Wednesday post with  
Kathleen of Faded Charm.

I got together with a few girlfriends the afternoon of the royal wedding to watch the goings on, to oh and ah or just laugh at the hats.  We wore hats and white gloves.  This is the party favor I brought.


 A little English Ivy in a vintage tea cup.


 I made a little tag from some lacy paper left over from a previous project.


Just for fun!


Quite the motley crew.....let's just say alcohol was involved and leave it at that.

Edited 5-19-11
I forgot to tell you all about the signs some kids were showing around my little girl's campus the day of the wedding.

KEEP 
CLAM
YOU 
CAN 
STILL 
MARRY 
HARRY

Well ya, he is the cuter one and the bad boy!  Too funny!!


Friday, May 6, 2011

Vintage Inspiration Friday and a Random Thought


Just a quick picture of something I picked up the other day.  Something that just puts a smile on my face when I see it.


Seriously, who thought "Ah, yes, a pickle planter, that's what we need!"

I guess they had me in mind.  
I was hoping my cards would fit the other way but they look cute this way as well.


So, here's a random thought.....

I refer to all my junking finds as my treasures.  I thought because they are as good as gold to me.  But as I'm squirreling away my finds from this morning, I got the feeling that I was hiding them, like buried treasure!  

And how many times have I wished I'll made a map!  Ha!


source


Anyway, in the mean time, I'm joining Debra at Common Ground for Vintage Inspiration Friday!


Thursday, May 5, 2011

Git'er Done or Close Enough


I want to share pictures with you all of my little clutter room.  Before we had this house built I studied as many floor plans for ideas that I could find.  This one old book from the library had floor plans with rooms set between the garage and the kitchen, almost a like a second kitchen, they called them "clutter rooms".  What a great concept!  Well, with space and money limits, something's gotta give and my clutter room is only half the size I wish it were.  This room has our utility sink, laundry, my desk, and pantry.  With so much going on, it ends up being my dumping ground.

I've started cleaning this room up many times but either gave up in frustration or got distracted by something sparkly, since the desk is where I make my jewelry!  Here's a before picture of my desk. 

 
No, this is NOT staged!  This would be my usual MO.
I'm lucky if I had 2 inches of desk to work on, ha!


So I recently got excited when Heather Bullard posted about her recently remodeled laundry room.  See where she added a pretty carpet in front of her machines and more about her lovely space here.

Now my room had been carpet free since I'd taken the piece of velco, that called itself a rug, out.  And this little old Karistan carpet was just taking up space in the garage when I decided to bring it back inside.  I first put it in front of the machines like Heather but my rolling chair kept getting caught on it.  

The rug finally gave me the final shove I needed  to clear out the room so you could actually see the floor.


This little face you see, looking around the corner on the right, is my Granma's string holder.  Love it!  My kids find it scary, can't wait for them to see it here, ha!


I just recently added that shelf just about the tops of the washer and dryer because I was so tired of fishing out hangers or socks that would fall behind the machines.  Also serves as a place for the bleach and soaps.


Would love to get some big beautiful shiny new machines, if my Mr. Wonderful would stop fixing these!  They've been around almost as long as him, 22+ years.
 

Ya, easily the busiest square footage in our house!


A few close ups of my jewelry area.


 I don't know, do I have enough sissors?!


 A few details.....


I had just some plain black cork material on the back splash of the counter desk.  Ideally,  I would put fabric here but never found exactly what I wanted.  These are Reader's Digest pages (hum, where did they come from?) stapled to the cork.  So no big expense or time spent if I do find the perfect fabric.  Even though not much of the back splash shows with all that's in front of it, the space is much brighter.


All my little chotchkies are put away and I even labeled the drawers!


Since I'd rather look at the pictures than read the words, (are you still with me here?) I cut out clear vinyl tags and 'clung' them to the drawer fronts with a little swipe of a wet wipe.

BTW, wet wipes are my new favorite 'tool' to have on the desk.  They take care of glue messes and clean figure prints or other missed grime from the vintage parts and pieces I use.


I got the idea to put corbels in the desk key hole area from a picture in a magazine, ages ago.

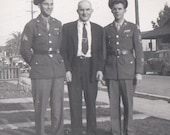
a little blurry, sorry!

So here's a shot of the rug that finally got me organized.  
Nothing all that special but surprisingly it really warms up the room! 


It's not the prettiest room in the house but until I decide to not do jewelry in this room, or fall out of love with all my good junk, or blow out the wall into the back yard, this is about as de-cluttered as it's gonna get in here.

What's left on the to-do list then?  Paint.....someday.....hopefully!

And then there's the mud room across the hall.....


Sunday, May 1, 2011

Wire Cloche Tutorial

  
A couple lovely ladies asked and I did take some pictures while I worked on the wire cloches, in anticipation of doing a tutorial, so here we go.....

See more pictures and my inspiration in my last post.

This is the cloche pictured in the pictures below.  I made 3 all together with some variations.

To start, you'll need re-bar wire (available at hardware stores), wire cutters, needle nose pliers, masking tape, and 8" cake pan (used as a form).

Cut 4 pieces of wire, 36" long.  Holding together, bend in the half and form into a loop, like a cursive little "e". Take one of the spokes and twist it around the base of the "e" a couple times then spread the other spokes out like the spokes of a wheel.  Using the same spoke, begin to weave around the top, over and under.  Having an odd number, 7, spokes will allow you to continuously go around, over and under at least 2 rows.  You should be able to do all this with your hands but use your plies to bend in the wire end to keep it form snagging on anything.


The "e" should form a knob on top, use plies to adjust.


Bend the spokes down forming the cloche shape.  Using plies, twist a loop and foot at the ends of the spokes.  This will make it safer for any puppies who insist on sitting next to you as you work.


 Make bends in the wire like this wherever you want a cross wire.  I have one at the bottom and a second about 5" up.
(This picture shows a cross wire because I added this step in the design as I worked to stop the cross wires from slipping.)


My 8" pan was a spring form and not the best choice, a plain pan will be easier to remove from your cloche.  Whatever size you use, measure the circumference and divide by 7.  For an 8" pan mark the masking take approx. every 3 5/8".


Tape the spokes at the marks.  (Again, your spokes will have the bent notches so will have to extend below the lip of the pan.)


Cut a piece of wire for the cross wire the circumference plus 8", (an extra inch to wrap around each spoke and an extra inch to end off.)  Tape down the end of the wire and begin to wrap the cross wire around the spoke.  (Again, you will be working below the lip of the pan not above as pictured.)


Pinch the cross wire tight/flat.


Then pinch the spoke notch tight around the cross wire.  You pan form will still be on, remember I added this step later.  Sorry, for the confusion.


After you work your way around, make a loop in one end, then thread the other end of the wire through the loop, bend, and pull tight around the pan.  Then trim excess and use pliers to close loop and remove pan form.


Repeat the process for each cross wire you add.  I wanted a pear shaped cloche so I used a 6" pan for my second cross wire.  I was hoping for a smooth, sexy, shapely cloche but ended up with some lumpy (cellulite?) lines.  Oh, well, that's life.

Hope that was clearer than mud.

Like I said I made 3 different cloches.  

One using 18 gauge wire, which is easy to manipulate, for the cross wires.  In this case use the 8th spoke to wrap around the base of the top knob a couple times and trim the excess.  Then attach the smaller wire to do the weaving, which will be much easier and go around 5-6 rows.

The last one was made using only the 18 gauge wire.  It's the smaller one pictured in my last post.  It turned out stronger/sturdier than I'd thought.  I might try this again and get more creative with fancier scroll work, since it's so much easier to work with.  

Another idea from one of my inspiration pictures is to have coils of wire the length of each spoke.  This would help to hold the cross wires in place and cut down on some of the notching and twisting I used.  If you did that I'd suggest using the 18 gauge wire, forming the coils on a 1/4", or smaller, wood dowel.  Slip them on the spokes before you curl up the feet.

BTW, I don't like the 18 gauge wire I have.  It appears to be painted black.  I used to be able to find this unfinished like the re-bar wire at he hardware store.  Hopefully I'll be able to find it again.

I'd love to see pictures of your creations, so please share! 

Good Luck!


And this is where that nosy puppy ended up.  Better safe than sorry!